ฟังเสียงหัวใจของโลกซิว่า ยังเต้นปกติอยู่มั้ย โลกถึงตัวร้อนแบบนี้
Are you ok, earth? Why you got high
Temperature?

Search
ฟังเสียงหัวใจของโลกซิว่า ยังเต้นปกติอยู่มั้ย โลกถึงตัวร้อนแบบนี้
Are you ok, earth? Why you got high
Temperature?
過年知道大家都好想我較蒸糕,今次教大家椰汁年糕,我依個版本同傳統有小小唔同, 想知點整就記得睇了,記得交功課呀😁
高清版:https://youtu.be/9EWgIo9y6MQ
椰汁年糕
材料:
📌糯米粉225克
📌沾米粉37克
📌澄麵30克
📌片糖200克大约2片多小小(要弄碎些比较容易煮得溶)
📌水210克
📌椰奶120毫升
📌oil 30克
📌錫纸盆掃上油
📌鍚紙一張
📌紅棗一粒
做法:
1. 先用小火在210g 水中煮溶所有
片糖後, 待涼
2. 將三種麵粉全部一起過篩, 並可
混合在一起備用
3. 將(1)的糖水過篩, 如未涼攪幾下
来降温後才加入椰奶
4. 將(2)的麵粉中間整個洞, 將糖水
分多次慢慢加入及每次攪匀了再
加入另一次
5. 加油入粉漿内可用手動打蛋器或
攪拌機攪至粉漿平滑直至没有粉
粒
6. 讓攪匀的粉漿静止20分鐘(可以
幫助麵粉吸入水份)
7. 將粉漿再次撹匀,然後再過篩倒
入蒸盆, 蓋上錫紙
8. 用蒸爐100度蒸1至1.5小時視乎
粉漿厚度. 如用明火蒸, 大火滾
起後, 用中大火蒸. 注意⚠️不要
太猛火否則容易會有洞在年糕面
蒸完加一粒紅棗在中間, 完成!
肥媽 Maria Cordero
YouTube Live – January 26, 2021 Recipe English Version
Simplified Coconut Chinese New Year Cake (“Nian Gao”)
Flour Ingredients:
Glutinous rice flour - 225g
Wheat starch (“Teng Mein”) - 30g (or replace with cornflour)
Rice flour - 37g
These flours combination will not give you a sticky and hard texture. It will be soft, bouncy, and chewy the next day instead of hard and sticky.
If you wish the make the traditional version, just omit the wheat starch (“Teng Mein”) and rice flour from the recipe and the rest remain the same.
Sweetener ingredient:
Chinese dark brown sugar - 200g or about 2 slabs (break into small pieces so they melt faster)
Liquid ingredients:
Water - 210g
Coconut milk - 120g (for more intense coconut flavor you can use coconut cream)
Oil - 30g or about 2 ½ tbsp
Garnish ingredient:
Chinese red date
Other utensils:
Sifter
Spatula
Whisk
Stand mixer – optional
Balloon whisk - optional
Oiled steam proof pan for steaming
Toothpick
Foil paper or plate to cover the pan
Methods:
1. In a large mixing bowl, you MUST SIFT the glutinous flour, rice flour, wheat starch (“Teng Mein”) into the bowl and mix well. Make a hole in the center. Set aside. This is your flour mixture.
2. In a cooking pot, add in Chinese dark brown sugar pieces, water, and turn on LOW heat to melt the sugar. DO NOT use high heat because it will evaporate the water.
3. Once it starts to boil, TURN OFF the heat and keep stirring to speed up the melting process.
4. Pour the melted sugar through a sifter into a large bowl to make sure there are no hard lumps of sugar left and MUST let it stand to cool to room temperature before mixing with other ingredients. Keep stirring to speed up the cooling process.
5. Once it is almost cool, add in the coconut milk. Mix well. This is your liquid mixture.
6. Add ONLY about ¼ of a cup of the liquid mixture into the well of the flour mixture prepared in Step 1.
7. Mix well with a spatula until all the liquid is absorbed into the flour. Continue with the rest of the liquid mixture by adding about ¼ cup at a time into the flour mixture and mix well before adding the next ¼ cup of liquid mixture. Be patience. **DO NOT add all the liquid into the flour at once.**
8. Once all liquid mixture has been mixed in with the flour, give a final good mix with a whisk and making sure there is no dry flour left.
9. Add the oil and continue mixing with a whisk until the oil is well incorporated into the batter or you can use an electric stand mixer, attached with a balloon whisk, and mix until you get a smooth batter about 1 minute or so on low speed.
10. Leave the batter in the mixing bowl and let it sit and rest for about 20 minutes. This step is VERY IMPORTANT to let the flour absorbs all the liquid and moisture for even flavor and a better tasting cake. This step also replaces the traditional way of laborious kneading of the batter.
11. Preheat the steam oven to 100C (212F).
12. After 20 minutes, mix the batter again with a spatula because flour will fall to the bottom of the bowl again after a waiting period.
13. You MUST SIFT the batter again into a bowl. This will make sure you get a smooth cake after.
14. Pour the batter into an oiled steam proof pan. Flatten any bubbles on the top surface with a toothpick. Cover the pan with a foil paper or plate to prevent condensation drippings.
15. Steam for 1 hour to 1 ½ hour depending on the thickness of your batter in the pan. Prefer to over steam instead of under steam.
DO NOT steam on high heat to prevent bubbles formed on the top surface of your cake when done.
16. The cake is done when you stick a bamboo stick into the center of the cake and comes out clean.
17. Garnish with a red date by placing it in the center of the cake.

ノルウェー:トロムソ
北部に位置する都市。オーロラの出現率が高く、また冬季でも比較的温暖なため、オーロラ鑑賞や犬ぞりなどが盛ん。
Norway:Tromsø
The city which is located in a northern part of Norway. The appearance ratio of aurora is high and temperature is comparatively warm.
★この絶景を抽選で5名にプレゼント!
トリッピースtwitterキャンペーンは2月6日まで。
http://bit.ly/1icMqkG [PR]

リアルチーズラーメンはここから注文できるよ!
https://amzn.to/2G5GxvM
オットギさんに提供していただきました、ありがとうございます😊
you can leave a comment if you have any suggestion on what you want me to eat next!😆
[use CC to enable Subtitles] Hello, my name is Kinoshita Yuka ! I love eating.
OoGui (eating a lot) is my channel's main focus. I often do a social eating live (Mukbang)
Today, i ate what called Ottogi ( is a South Korean food company headquartered in Daechi-dong ) Real Cheese Ramen Ramyun Noodle Soup ( The Genuine Taste of Cheese, based on the liquid type Cheese Sauce , buldak ,Samyang ) , and i added to it green onion, bacon, Onsen tamago ( Soft-Cooked Eggs , is a traditional Japanese low temperature egg ) and a lot more, All that is so high in calories . it was so it was so tasty and delicious, thanks again to ottogi for this precious gift !!
やってほしいことや食べてほしいものがあったらコメント欄で教えてください!😆
台湾での震災を受けてUUUMオリジナルのチャリティリストバンドを作成しました。
この売り上げは全額寄付させていただきます。
#台湾加油 !みんなが力を合わせれば大きな力になるよ!https://muuu.com/videos/3114dc865d8ddbc0
被災された台湾の方たちが早く安心した生活に戻れますように
台湾東部地震 緊急支援募金(Yahoo!基金) - Yahoo!ネット募金
https://donation.yahoo.co.jp/detail/1630034/
weibo(中国の大きいSNS)にも動画やコメントを載せているよ!
https://weibo.com/mochiko0204
⭐️木下ゆうかオリジナルグッズ \(﹡ˆOˆ﹡)/
【パーカーとマグカップが新しくなりました!】https://uuum.skiyaki.net/yuka_kinoshita
⭐木下ゆうかLINEスタンプ2でたよ!!!ᐠ( ᐢᐢ )ᐟ
https://store.line.me/stickershop/product/1265744/ja
LINEアプリ内の、スタンプショップで『木下ゆうか』と検索すると出てきます!
セカンドチャンネル作りました!∩^ω^∩
木下ゆうかのゆるちゃん!/YukaKinoshita2
https://www.youtube.com/channel/UCjpPqow_Rlv0A9RePeJ6nAA
【はらぺこパズル】ごはんに恋をした
[iOS]http://bit.ly/2aWQUDK
[Android]http://bit.ly/2btZ3eP
【大食いYouTuber】木下ゆうか はじめてのPhotoBook
木下ゆうかPhotobook "yuuka"
定価:1250円(税別)
発売元:講談社
全国の書店の他、ネット書店で販売中!
http://kc.kodansha.co.jp/product?isbn=9784063650099
木下ゆうか:“Yuka Kinoshita” Japanese
⭐️[[TURN ON CC FOR SUBTITLES]] ⭐️
Thank you Aphexx(@aphexx9 )-English subtitles
Thank you Range o(@orange0204)-Chinese subtitles
Thank you Waza_leji(Ieji_San) -Arabic subtitles
Thank you Taejun Lee -Korean subtitles
Thank you Jane-Korean subtitles
Thank you miu sister-Indonesian subtitles
Thank you Sony Boy-German subtitles
Thank you 香港國のパンダ・M-Hong Kong subtitles
Thank you 日本語字幕 Soraさん
Thank you My Nguyen-Vietnamese subtitles
for supporting in making subtitle.
If you've captioned/subbed one of my videos please inform me via E-mail. Thank you
⭐️エンディングなどのイラストは、ケイジェーさんに書いていただきました!(Twitter @K__j_344)
http://t.co/rWRrlpd5Pc
木下ゆうか年表
https://sites.google.com/a/origin-rise.twbbs.org/origin-rise/mochiko
Thank you Mr. Range o!
⭐︎FOLLOW ME
Twitter https://twitter.com/mochiko0204
instagram https://www.instagram.com/yuka_kinoshita_0204/?hl=ja
Facebook https://www.facebook.com/pages/%E6%9C%A8%E4%B8%8B%E3%82%86%E3%81%86%E3%81%8B-KinoshitaYuka/825093884226382
大食いが不思議な方は是非この動画を観てください!
http://www.youtube.com/watch?v=wJ3qb8tTUlM&sns=em
I’m also a competitive eater as a job.
Please let me know via email or comment if you have any requests what you want me to try or you wanna have a food battle with me!
素材提供 PIXTA
お仕事の依頼はこちらにメールください(﹡ˆᴗˆ﹡)
Please contact me if you have any job requests.
[email protected]


#Giant #Pocky #Chocolate #Cake #Recipe #ASMR #OddlySatisfying #音フェチ
We made a large, tall cake using giant Pocky! We attached 40 giant pocky sticks around the cake layered 14 cm high in nine layers, and decorated it with 61 red and brown chocolates colored like pocky. Making this cake is easier said than done!
*Recipe*
1. Warm 300g of unsalted butter to room temperature and stir it with a whisk.
2. Mix in 240g of granulated sugar.
3. Beat six eggs and it to the mixture in several parts, mixing each in individually.
4. Add 420g of pancake mix.
5. Gently mix with a rubber spatula.
6. Divide the mixture from step 5 in half. Mix in 20g of raspberry crunch into one.
7. Divide the mixture between four separate 12cm bottomless round cake molds. The center of the cakes will rise, so be sure to make a depression in the middle.
8. Preheat the oven to 340°F and bake for 33 minutes.
9. Check the cakes with a bamboo skewer. They will be ready when nothing sticks to the skewer as it's pulled out.
10. While the cakes are still warm, gently take them out of their molds such that the the bottom faces upwards.
11. Cover them in plastic wrap so that they don't dry out and allow them to cool.
12. Now, slice them. This time, we sliced them into 14mm layers.
13. Now it's time to make the chocolate cream. Beat 400ml of fresh creme (42% butter fat) until soft peaks form.
14. Add 200g chocolate syrup and whisk. (Half will be used between the layers and half will be used for the outer coating)
15. Take the cake layers from step 12 and stack them in nine layers, spreading the chocolate cream from step 14 between each.
16. Thinly apply some of the chocolate cream from step 14 around the around the assembled layers from step 15, making a bottom coat. After that, refrigerate.
17. Apply the chocolate cream to make an outer coat. By the way, the rotating stand under the cake is a spice rack from a dollar store.
18. Decorate the result from step 17 as you please. It's also fine if you leave it as it is.
19. Attach giant pocky sticks around the cake.
20. Refrigerate.
21. It's finished. We learned that the colored chocolates from Muji are weak to changes in temperature, and for us the color ended up having a sad time of it. Next time we'll make it with M&M's.
ジャイアントポッキーを使って大きくて高いケーキを作りました。9層に重ねた高さ14センチのケーキに40本のジャイアントポッキーをぐるっとくっつけて、61個のポッキーのイメージカラーの赤と茶色のチョコレートでデコりました。言うのは簡単、作るのは大変、そういうケーキの動画です。どうぞご覧ください。
*レシピ*
1.室温に戻しておいた、無塩バター 300gを泡立て器で混ぜる。
2.グラニュー糖 240gを入れ混ぜる。
3.溶き卵 6個を数回に分けて入れ、その都度 混ぜる。
4.ホットケーキミックス 420gを入れる。
5.ゴムベラでさっくりと混ぜる。
6.5の半量にラズベリークランチ 20gを入れ混ぜる。
7.12センチ セルクル型、4個に入れる。焼き上がり中央がふくらむので、思い切って真ん中を凹ませるとよい。
8.170度に予熱したオーブンで33分程焼く。
9.焼き上がりを竹串をさして確認する。何もついてこなければ大丈夫。
10.温かいうちに底が上になるよう、そっとケーキを取り出す。
11.乾燥しないようにラップなどをかけ冷ます。
12.11をスライスする。今回、1枚14ミリほどにスライスしました。
13.チョコレートクリームを作ります。生クリーム(乳脂肪分42%)400mlを7分立てにする。
14.チョコレートシロップ 200gを入れ、さらに泡立てる。(半量をサンド用に半量を周りのナペ用に使います)
15.14のチョコレートクリームをサンドしながら12を9層に重ねる。ラズベリー入り味とプレーン味を交互に重ねる。冷蔵庫で冷やす。
16.15の周りに14を薄く塗り、下地を作る。冷蔵庫で冷やす。
17.16を14でナペする。ちなみにケーキの下の回転台は100円ショップの調味料置きで代用しています。
18.17の上にお好みのデコをする。なくても大丈夫。
19.ケーキの周囲にジャイアントポッキーをくっつける。
20.冷蔵庫で冷やす。
21.でけた。無印良品のカラーチョコレートは温度変化に弱く、色が悲しいことになった。次回はM&M’sチョコレートで作る。勉強になりました。


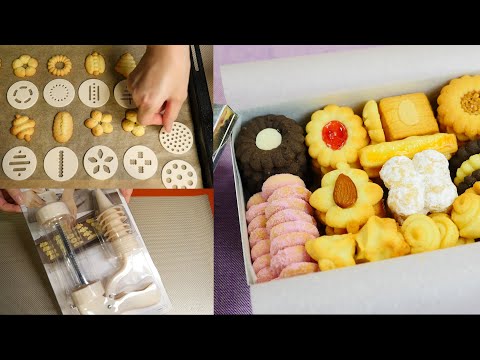
ダイソーのベーキングガンのディスク 13種類、絞り口 6種類、計19種類を全部試して、クッキー缶を作りました。2種類のディスクがなかなか使いこなせなかったのですが、ディスクや絞り口を付け替えるだけなので、色んな種類のクッキーが簡単にできるのがスゴイ!と思いました。前回の動画で作ったロミアスクッキーも入れて簡単なデコだけで作ったクッキー缶、ご覧ください。
*レシピ*(およそ90枚 16✕11✕高さ5センチの缶 2箱分)
1.卵 1個を卵白と卵黄に分ける。
卵白を溶き、30gを計る。
残りの卵白と卵黄は合わせて冷蔵庫に入れておく。
2.室温にした無塩バター 185gを混ぜる。
3.粉砂糖 75gを入れ混ぜる。
4.1も卵白 30gを入れ混ぜる。
5.バニラオイルを数滴入れ混ぜる。
6.薄力粉 250g、アーモンドパウダー 75gをフルイ入れ混ぜる。
7.ベーキングガンに入れ絞り出す。
生地は柔らかすぎても硬すぎてもダメです。
ディスクによって絞りやすい生地の硬さには差があると感じました。(絞り口は全種類問題なし)生地が柔らかいと絞り出した時に角(?)ができてしまいブサイクなクッキーになってしまうので、少し固めの生地がミタメ的には良いと感じました。
絞り出しに適していたのは、基本、我が家にあるオーブンシート系、全部大丈夫でした。セリアで買ったオーブンシートはツルツル過ぎて絞りづらかったです。柔らかい生地の時は繰り返し使えるオーブンシートとシルパンは生地が若干くっつきにくく、形がイビツになりました。
スティック状のクッキーは長さ5.5センチに絞り出し焼きました。バラのようなクッキーは10センチほどに絞り出した生地をクルクルと巻いて作りました。
8.アーモンドスライスやアーモンドを置き、押し込む。
1の卵黄と卵白を混ぜたものを塗り、ツヤ出しに使う。
ジャムを入れる場所を凹ませる。
9.170度に予熱したオーブンで13分焼く。
ジャムクッキーは10分焼いたら一旦、取り出し、スプーンなどで凹ませる。よくほぐしたいちごジャムを入れオーブンに戻し、更に5分焼く。ジャムは入れすぎると溢れ出すので気をつけて!
10.焼き上がったら冷ます。
粉砂糖をまぶす。
11.缶(セリア ブリキ レクタングルBOX)に詰める。
クッキーの向きが逆かなぁ とか途中、やり直したり、色々試しながら並べる。隙間なく並べられるように小さめのものやスティック状のもの、四角いものなどを作っておくと詰めやすいです。
12.でけた。リボン掛けちゃおう。
#ダイソー #ベーキングガン #クッキーガン #ロミアスクッキー #クッキーボックス
We tried out the baking gun's 13 discs and 6 tips, a total of 19 types, and made a cookie can. There were two discs that we couldn't use, but it was still amazing to be able to easily make many types of cookies by just replacing the discs and tips! We included the romias-style cookies we made in a previous video and made a cookie can with very simple decorations, check it out.
*Recipe* (About 90 cookies, 2 cans, 16x11x5cm high.)
1. Separate the white and yolk of one egg.
Beat the egg white and measure 30g.
Leave the rest of the white and yolk in the fridge for glazing.
2. Mix in 185g room-temperature unsalted butter.
3. Mix in 75g powdered sugar.
4. Mix in the 30g egg white from step 1.
5. Mix in a few drops of vanilla oil.
6. Sift 250g low-viscosity flour and 75g almond powder, and mix.
7. Put the mixture in the baking gun and squeeze it out.
8. Place whole or sliced almonds on top and push them in.
Mix the egg yolk and white from step 1 and glaze the cookies with it.
Make a dent where you plan to put jam.
9. Bake for 13 minutes in an oven preheated to 170 degrees.
After 10 minutes, take out the jam cookies temporarily and make a dent with a spoon. Stir some strawberry jam well, then add it to the cookies. Put them back in the oven and let them bake for another five minutes. If you put too much jam it will overflow, so be careful!
10. Cool them down once they are done baking.
Sprinkle them with powdered sugar.
11. Pack them in a ¥100-store can.
We arranged the cookies while wondering whether they were in the right direction, starting over, and experimenting. You can easily arrange them with no gaps using cylinder, square, and small objects.
12. It's done. Let's add a ribbon too.
It's also called a high temperature, hyperthermia, or pyrexia, and it's usually a sign that your body is working to keep you healthy from an ... ... <看更多>
Your body's normal temperature is between 36 and 36.8 degrees Celsius. A high temperature or fever, for most people, is when your body temperature is 38C or ... ... <看更多>
high temperature 在 High temperature (fever) in adults - NHS 的相關結果
A high temperature is usually considered to be 38C or above. This is sometimes called a fever. Many things can cause a high temperature, but it's usually caused ... ... <看更多>