今日教大家煮
📌芋頭糕
📌金菇肥牛
📌易到你唔信朱古力蛋糕
啖啖肉訂購資料
查詢What’s App 5282 4360
訂購What’s App 9038 6920
資料連結👇🏻
http://bit.ly/2WO3IjW
✨✨✨✨✨✨✨✨✨✨✨✨
📌SANISWISS 消毒套餐
Whatsapp 落單
https://wa.me/message/CTVOSX4BRU5PP1
✨✨✨✨✨✨✨✨✨✨✨✨
📌海味套餐連結
nine9Nine9 Shop
👉VIP Code : MAMA20
📌http://nine9nine9shop.com
📱Whatsapp:+852 94002845
✉️info@9-beauty.com
2021123 Live recipes 中英對照
特別鳴謝Easycook 義工團,咁快就做起食譜🙇♀️
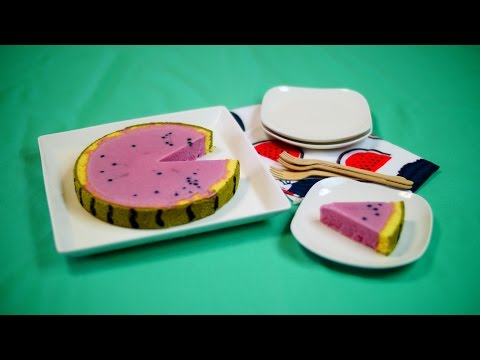
易到你唔信朱古力蛋糕
材料
📌 黑朱古力180g
📌 雞蛋4隻
📌 糖霜少許
📌 士多啤梨1粒
做法
1. 黑朱古力放在碗內,弄碎,之後放入微波爐叮2分鐘,或用熱水墊底溶解朱古力。
2. 雞蛋分開蛋黃和蛋白。4份蛋白用電動打蛋器打至白泡狀。備用。
3. 4份蛋黃分別放在4小碗。朱古力叮好取出,先攪勻,之後放入第1份蛋黃,不停攪均,再放入第2份蛋黃一起不停攪勻,之後第3份蛋黃,再第4份蛋黃,如此類推,直至完全攪勻。
4. 打好了的蛋白遂少逐少分數次加入在朱古力漿內,完全攪勻。
5. 準備焗盤,盤底掃油,盤側邊圍上牛油紙,焗爐放熱水,焗盤坐底,以140度焗20分鐘。
6. 時間到,取出朱古力蛋糕,糖霜篩在蛋糕面上,再加上士多啤梨作裝飾,即成。
提示:1. 朱古力可選用牛奶朱古力
2. 蛋黃放入朱古力漿時,要快手攪勻。
3. 如果用鑊蒸,隔水蒸40 – 45分鐘。
English Version
Easy Flourless Chocolate Cake
(YouTube video starts at 25:36.)
Ingredients:
Egg yolks - 4 (to be added one at a time)
Sweetened chocolate bars - 180g (your choice of dark chocolate or milk chocolate. Break into small pieces and melt them in the microwave for 2 minutes or use a double boiler.)
Egg whites - 4 (beat until stiff peak)
6 inch cake pan
Garnish ingredient:
Icing sugar
Strawberries
Ice cream - optional
Methods:
1. In a stand mixer bowl, add in 4 egg whites, and beat until stiff peak. Set aside.
2. In a separate big bowl, add in room temperature melted chocolate, 1 egg yolk, and mix well by stirring quickly in one direction.
3. Continue with the remaining 3 egg yolks by adding in ONE AT A TIME until you get a smooth chocolate batter.
4. Add a bit of beaten egg whites from the stand mixer bowl into the chocolate batter and mix well to get a nice consistency as the beaten egg whites.
5. Pour the entire chocolate batter into the beaten egg whites in the stand mixer bowl, and mix well. Make sure all egg whites are incorporated into the chocolate batter.
6. Transfer to a 6 inch cake pan greased and lined with parchment paper.
7. Bake by using water bath at 160C (320F) for about 20 minutes or less with a tray of water at the bottom of your oven or underneath the baking pan. Adjust the time and temperature accordingly to your oven. You can also steam it for 40 to 45 minutes.
8. Garnish with icing sugar and strawberries. Serve.
✨✨✨✨✨✨✨✨✨✨✨✨
氣炸金菇肥牛卷
材料:
肥牛片 一包(大約$20片)
金菇 兩包(切掉根部,洗乾淨,抹乾水份)
調味料:
椒鹽粉 適量
鹽 適量
胡椒粉 適量胡椒粉
紅椒粉 適量(可不用)
做法:
1. 肥牛片灑上少許椒鹽粉和鹽
2. 每片肥牛卷入一小撮金菇後,放入氣炸鍋焗盆內,再灑上調味料,跟着噴油在肥牛卷上,然後放入氣炸鍋,用攝氏200度焗3至4分鐘
即成(不可多過4分鐘,否則會過熟).
English Version
Enoki Mushroom Beef Rolls
(YouTube video starts at 39:18.)
Ingredient:
Sliced fatty beef slices - (or use pork tenderloin slices or lamb slices)
Filling ingredient:
Enoki mushrooms
Carrot shreds - optional
Blanched Gai Lan stems - optional
Asparagus - optional
Seasoning ingredients:
Szechuan pepper salt
Red chili powder
Salt
Methods:
1. Roll each beef slice with enoki mushrooms filling.
2. Optional to season the beef slices with Szechuan pepper salt, red chili powder, and/or salt before rolling or after rolling.
3. Place a parchment paper in the air dryer basket, spray a layer of oil, place beef rolls on top and spray another layer of oil on top.
4. Air fry for 3 minutes for medium-well or 4 minutes for well done at 200C (393F).
5. Transfer to serving plate. Serve.
✨✨✨✨✨✨✨✨✨✨
芋頭榚
材料:芋頭一斤四兩,蝦米隨意,冬菇3隻,瑤柱4-5粒,一孖臘腸,粘米粉160g, 粟粉4湯匙,芝麻同蔥適量
調味料: 五香粉一茶匙,固體植物油一湯匙半,鹽及糖各半茶匙,白胡椒粉半茶匙多些
準備: 配料蝦米,冬菇,瑤柱用水浸軟切細,(水留用), 臘腸切細粒
芋頭一半切條,一半切粒
粉漿: 用浸過配料的水幾粘米粉同粟粉攪勻,粉漿水大概700ml
做法:
芋頭放鑊中,加多些油炒至金黃,有香味盛起。
熱鑊加油,先放蝦米爆,加臘腸爆香,加冬菇爆香,最後加瑤柱炒。
這時加調味料炒勻,加入芋頭加一杯半水,加蓋稍煮一會,開蓋倒入粉漿水,一邊倒一邊翻炒至杰身。
錫盆掃上油後倒入芋頭粉漿隔水蒸35分鐘即成。
備註:
煮芋頭水量及油量,視乎芋頭質粉或爽,
選靚芋頭要輕身。
蝦米可買價錢平的。調味料也可炒芋頭時加入
English Version
Taro Cake
(YouTube video starts at 0:53.)
Ingredients:
Taro - about 1 kg and pick the lightest ones for more starchy-texture. Cut half into strips and the other half into cubes. This will have a different bite texture when steamed. Must be pan-fried until fragrant and golden brown with extra oil than usual.
Dried shrimps - preferable buy the cheapest and smallest kinds. Clean and soak to rehydrate (save the soaking liquid), and chop into small pieces.
Dried mushrooms - 3 big ones. Clean and soak to rehydrate (save the soaking liquid) and chop into small pieces.
Dried scallops - about 4 -5. Clean and soak to rehydrate (save the soaking liquid) and cut horizontally sideway to shorten the strands then loosen into small pieces.
Chinese sausages - 2 clean and chop into small pieces
Chinese cured pork strips (“Lap Yuk”) - optional
Binding batter ingredients:
Rice flour - 160g – 180g
Corn flour/starch - 4 tbsp (or use “Teng Mein” flour 4 tbsp or less. This will prevent the taro cake from coming apart.)
Saved soaking liquid from dried shrimps, mushrooms, and scallops - about 3 cups (If you do not have 3 cups just compensate with more water.)
Water - about 1 ½ cups or more depending on how much the taro absorbs the liquid. The more starchy-texture the taro has the more liquid it absorbs.
Seasoning ingredients:
Vegetable shortening - 1 ½ tbsp (or use lard. This is for smoothness in taste)
Five-spice powder - 1 tsp
White pepper - heaping ½ tsp
Salt - ½ tsp but not too much
Sugar - ½ tsp
Garnish ingredients:
White sesame seeds
Green onion pieces
Methods:
1. In a bowl, add in saved soaking liquid from dried shrimps, mushrooms, scallops, and mix well. Add in rice flour, cornflour, and mix well. Set aside
2. Heat up a wok, add more oil than usual. Add in all taro pieces and fry until fragrant and golden brown. Transfer to serving plate. Set aside.
3. In the same wok, add in oil, dried shrimps, Chinese sausage pieces, and fry until fragrant.
4. Add in mushroom pieces, and fry until fragrant.
5. Lastly, add in dried scallops, and fry briefly to avoid toughness when chewed.
6. Add in vegetable shortening, five-spice powder, white pepper, sugar, and mix well.
7. Return fried taro pieces back to the work and mix well.
8. Add in 1 cup of water, mix well, cover wok with lid, and bring to a boil.
9. Add another ½ cup of water, mix well, and bring to a boil.
10. Add in binding batter prepared in Step 1. Mix well. The mixture will slowly thicken. Add more water now if you find it too thick.
11. Transfer to a steam proof OILED container.
12. Steam for about 35 to 40 minutes.
Note: Best to pan fry them the next day.
#肥媽食譜
#Mariarecipes
同時也有180部Youtube影片,追蹤數超過304萬的網紅MosoGourmet 妄想グルメ,也在其Youtube影片中提到,#Watermelon #IceCreamCake #Recipe We set out to make a chilled desert that looked like a watermelon, using watermelon flavored ice cream. Our yearly ...
cream cake filling 在 OneFM William Facebook 八卦
William San带你吃好料!!!
J&D Espresso
G.B06 ,Oasis BU 11 , Lebuh Bandar Utama , Bandar Utama , 47800 PJ
9am-6pm 7 days a week
85% homemade
-Big aussie breakfast rm 29
Choice of 2 eggs , served with pork bacon , smoke garlic sausage , cherry tomatoes , mushroom medley , baked beans , sourdough toast & crispy mushroom croquetas
-Country chicken pie rm 21(好吃)
Puff pastry with creamy chicken , bacon , mushroom & leek filling
-Pancake stack rm 18
Warm fluffy pancakes served with mixed berry compote , salted butter & anzac crumbs(特别开胃!)
-Bacon & egg pancakes rm21 (咸味pancakes)
Fluffy pancakes with poached egg , pork bacon , mushroom & herbed spinach drizzled with savoury maple sauce for the adventurous breakfast (非常诱人!)
-Vodka battered fish & chips rm 29
House specialty of vodka battered dory served with herbed fries & salad
(搭配上店家特制的Roasted lemon dressing,一入口就尝到了柠檬的清新,不会觉得腻,和平常吃到的 沾酱感觉很不一样)
-Seafood Squid Ink Pasta RM33 (特别)
Squid Ink Spaghetti cooked in a seafood bisque served with grilled prawn, squid and topped with Parmesan.
-Passion Fruit Pavlova RM 15 (一定要试!)
Meringue dessert with a crisp crust & sofct marshmallow centre served with strawberries & mango topped with passion fruit coulis.
-Molten Chocolate Lava Cake RM13 (一定要试!)
Warm chocolate cake with a sinful molten chocolate centre. Served with vanilla ice cream.
cream cake filling 在 The MeatMen Facebook 八卦
Full Recipe: whisknfold.com/tiramisu-mille-crepe-cake
Mille Crêpe Cakes are gaining popularity lately in local cafes. They are not only instagram-worthy, the combination of thin crêpes with an equally thin layer of cream filling is surprisingly light on the palate. Here we present to you our Tiramisu version and hope you enjoy making it as much as eating it cos we sure do!
Like and follow our new baking channel Whisk n Fold for more baking recipes!
cream cake filling 在 MosoGourmet 妄想グルメ Youtube 的評價
#Watermelon #IceCreamCake #Recipe
We set out to make a chilled desert that looked like a watermelon, using watermelon flavored ice cream. Our yearly watermelon dessert. This is Mosogourmet's 2015 version. The watermelon filling tastes good frozen, but can also be eaten as-is, or be re-cooled in the refrigerator to enjoy later. It's delicious out of the freezer and just beginning to melt, too. There were a series of mishaps, like the consistency not coming out right and requiring a do-over with more gelatin, and the sponge floating on the filling, but we ended up with a fun dessert!
スイカ味のアイスクリームを使って作る、見た目がスイカみたいな冷たいデザートを作ってみました。毎年、恒例のスイカデザート。コレが妄想グルメ、2015年バージョンになります。スイカ味のフィリングは冷凍してもよいのですが、そのまま食べたり、冷蔵庫でさらに冷やしても楽しめます。冷凍庫から出して、溶けかけをいただくのもオイシイですよ。濃度がつかなくてゼラチンを増やして やり直したり、スポンジがフィリングに浮いてしまったりとハプニング続きでしたが、楽しいスイカデザート できました!レシピは長かったのでアメブロで http://amba.to/1VMrNRj
ツイッター https://twitter.com/mosogourmet
ニコニコ動画 http://www.nicovideo.jp/user/11111118/video
*Recipe*
Bake sponge cake
1. Line a 27 cm square baking pan with parchment paper, and coat with a thin layer of oil.
First, bake the green sponge cake
2. Divide the white and yolk of 1 egg.
3. Beat the egg white briefly with a mixer until it has turned entirely white. (Hand mixer on high speed.)
4. Add in 25 g of granulated sugar and beat thoroughly until peaks form.
5. Add in the egg yolk and mix again.
6. Dissolve 3g (1 1/2 tsp) of matcha in a small amount of hot water. Mix into egg mixture.
7. Sift in 13 g (1 2/3 tbsp) of cake flour, combine briefly at a low speed, then switch to a rubber spatula, and mix thoroughly until the flour is fully incorporated.
8. Pour your mixture into the pan from Step 1, and level it off.
9. Tap the pan on the counter to remove any large air bubbles, then bake for 4 1/2 minutes in a 200° preheated oven.
10. When it has finished baking, cover it with parchment paper or something to keep it from drying out.
Next, bake the white sponge cake
11. Divide the whites and yolks of 3 eggs.
12. Mix the same way as you did in Steps 3–5.(Granulated sugar 75g)
13. Sift in 37 g (4 1/2 tbsp) of cake flour, combine briefly on low speed, switch to a rubber spatula, and mix thoroughly until the flour is fully incorporated.
14. Pour this mixture into the pan from Step 10, and level it off.
15. Tap the pan on the counter to remove the large air bubbles, then bake for 6 minutes in a 200° preheated oven.
16. When it has finished baking, cover it with parchment paper or something to keep it from drying out.
Use watermelon ice cream to make the filling.
17. Once your sponge cake has cooled from Step 16, cut it into 2.5 cm wide slices, and cut the slices off diagonally at each end. (You will use two slices, plus about 7 cm.)
18. Line the circumference of the mold with parchment paper.
19. Place the pieces from Step 17 into the mold, as if trying to stick them to the paper, leaving no gaps.
20. Sprinkle 13 g of gelatin into 50 ml of water, and allow it to soak.
21. Heat the mixture in the microwave for about 30 seconds to dissolve the gelatin. (Do not let it come to a boil.)
22. Warm 140 ml of milk without letting it boil.
23. Mix the gelatin mixture into the milk.
24. Mix in 35 ml of watermelon syrup.
25. When that has cooled, add two packages of watermelon ice cream (380 ml / 310 g) and use mixer to blend.
26. Pour the mixture into your mold from Step 19, and allow it to cool and harden in the freezer for about 8 hours.
27. Draw on the black watermelon rind stripes with black cocoa powder melted into a small amount of water.
28. Slice and enjoy.
cream cake filling 在 MosoGourmet 妄想グルメ Youtube 的評價
#Giant #Popsicle #Cake #Recipe #ASMR #OddlySatisfying #音フェチ
In Japan Meiji has a product called kakuten-bou ice soda, similar to the Creamsicle popsicle sold overseas. We decided to make a super-sized version!
http://catalog-p.meiji.co.jp/products/sweets/icecream/010505/4902705011939.html
The stick is actually a cookie! It's so big, that we recommend slicing it up and sharing it with friends and family.
Recipe: (1 liter milk carton for one bar)
1. Add 10 gm of blue Hawaiian syrup to 75 gm of sugar cider.
2. Pour in 1 to a one liter milk carton
3. Place it on its side and freeze for one hour. It takes about two hours to harden
4. Make 1 again and pour into 3. Place it on it side again, this time the opposite side and refreeze
5. make 1 again and pour 70 gm of it into 3. Place it on its side and freeze
6. Repeat 5 again to make four sides for the soda ice.
7. Make a soda ice mix using half of the portions for 1. Put 35 gm of it into 6, this time while the carton is standing.
8. Put 15 gm of sugar into two eggs and whip well on a vessel heated in warm water at about 50 degrees to making a foam. Take out the eggs from the vessel once they are warm.
9. add 15 gm of sugar to 135 gm of fresh cream. Add a few drops of vanilla essence and make a foam. Make it so that it's a little harder than 8.
10. break 9 down to portions of one-third each and add to 8. Mix quickly so that the foam doesn't disappear.
11. Pour 10 into 7 and freeze.
12. After an hour, insert the cookie into the bar. Cookies that are about 2 cm wide would be the most suitable size.
13. After 3 hours, tear the milk carton and take out the ice cream bar.
14. It's really filling because it's so big. It's not too sweet so you could add more sugar according to your preference (up to 45 gm).
明治の「角10棒アイスソーダ」というのがありますが「これ、でっかく作れるかも」と思ったのでやってみました。http://catalog-p.meiji.co.jp/products/sweets/icecream/010505/4902705011939.html ソーダアイスの中にバニラアイスを入れた、でっかいアイスバー。棒はダミーのクッキーです。これで切り分けて食べられます。大きいからね、みんなで食べてね。
*レシピ*(1リットル用の牛乳パック 1個分)
1.ブルーハワイシロップ 10gに加糖サイダー 75gを入れる。
2.よく洗った、1リットル用の牛乳パックに1を流し入れる。
3.倒して冷凍する。2時間弱で固まる。
4.1を再度作り、3に流し込み、反対側面に倒して冷凍する。
5.1を再度作り、3に70g分 流し込む。倒して冷凍する。
6.5を再度繰り返し、4面のソーダアイスの壁を作る。
7.1の半量でソーダアイス液を作り、6に35g分 流し込み、今度は立てて冷凍する。
8.卵 2個に砂糖 15gを入れ、50度はどの湯煎にかけながらしっかりと泡立てる。途中、卵が人肌に温まったら湯煎から外してよい。
9.冷やしておいた、生クリーム 135gに砂糖 15g、バニラエッセンス 数滴を入れ泡だてる。8のより少し硬いくらいまで泡立てる。
10.9を8に1/3ずつ加え、泡を消さないように手早く混ぜる。
11.10を7に流し込み冷凍する。
12.1時間程経ったら、バーに見立てたクッキーを差し込む。2センチ幅のものがサイズ感がちょうどよい。
13.さらに3時間冷凍したら牛乳パックを破いてアイスバーを取り出す。
14.でかいから食べごたえあるよ。甘さ控えめのできあがりなので、バニラアイスの砂糖をお好みで増やして(〜45gまで)作ってください。
cream cake filling 在 MosoGourmet 妄想グルメ Youtube 的評價
We tried following the trend and made a galaxy pattern cake.This is a recipe for an easy to make tart base and filling.
*Recipe* (makes one 18cm tart)
We'll make the tart base out of store bought biscuits.
1. Finely crush 140g of biscuits.
2. Mix in 10g of black cocoa powder.
3. Mix in 60g of melted unsalted butter.
4. Pour the mixture from Step 3 into a tart mold, and using something like the bottom of a cup, firmly press the mixture into the shape of the mold.
5. Leave to cool in the fridge.
6. Preheat the oven to 180 degrees.
7. Bake for 15 minutes.
Now we'll make the rare cheesecake filling.
8. Place 60g of marshmallows in a heat resistant container, add 80g of cream cheese, and heat in a 600w microwave for 1 minute.
9. Mix with a whisk. If there are any unmelted parts, heat in the microwave while keeping an eye on it.
10. Stir in 60g of milk.
11. Stir in 5g (1 teaspoon) of lemon juice.
12. Distribute among containers.
13. Add color to your liking. This time I opted for blue, red, and black food coloring. I think leaving some areas of unmixed color helps create a spacey vibe. As we'll be using it adjust the color, also leave some white.
14. Pour the mixture from Step 13 into the base from Step 5. It's best to start with the darker colors. Adding the mixture in a fixed direction helps create the right look. Without fussing over it too much, using something like the back of a spoon, brush gently to adjust the design.
15. Add dots randomly using the white mixture. Sprinkle pearl, silver, or white cake sprinkles to add to the spacey vibe.
16. Leave to cool in the fridge for about 1 hour.
17. The design is a matter of sense and luck. That's something to be enjoyed while making it. To those who say, "It doesn't look like space," I'll leave it to Saint Seiya to reply. "Have you ever felt the Cosmos inside you?!"
Steps 1-3 can also be completed by putting the ingredients into something like a zip lock bag and then beating it with cotton swabs. The amount of melted unsalted butter used in the tart base should be adjusted according to the type of biscuit you use. Of course the tart base can be eaten after just cooling it. For those of you who would like a crunchy texture, we suggest baking it in the oven.
ギャラクシー柄に挑戦。流行りに乗ってみました。タルト台もフィリングも簡単に作れちゃうレシピです。
*レシピ*(18cmのタルト 1個分)
市販のビスケットでタルト台を作ります。
1.ビスケット 140gを細かく砕く。
2.ブラックココアパウダー 10gを入れ混ぜる。
3.溶かし無塩バター 60gも入れて混ぜる。
4.タルト型に3を入れ、コップの底などで、ぎゅうぎゅうと押し付け、タルト台形に成形する。
5.冷蔵庫で冷やしておく。
6.180度にオーブンを予熱する。
7.5を15分焼く。
レアチーズケーキフィリングを作ります。
8.耐熱容器にマシュマロ 60g、クリームチーズ 80gを入れ、600wの電子レンジで1分加熱する。
9.泡立て器で混ぜる。溶け残りがある時は、様子を見ながら電子レンジで加熱してください。
10.牛乳 60gを加え混ぜる。
11.レモン汁 5g(小さじ 1)も加え混ぜる。
12.器に取り分ける。
13.好みの色に着色する。今回、青、赤、黒の食用色素を使って着色しました。着色料を混ぜ切らない状態の色もあると宇宙の雰囲気が出ると思います。色の調整にも使えるので白も少し取り分けておく。
14.13を5に流し入れる。暗い色から入れていくとよい。一定方向に入れたほうがそれっぽくなります。あまりいじらず、スプーンの背などで軽く撫でる程度で柄を整える。
15.白でランダムなドット柄を付ける。パールやシルバー、白のアラザンを散らすと宇宙感が増します。
16.冷蔵庫で1時間ほど冷やす。
17.柄はセンスと運。それを楽しんで作る。「宇宙に見えない」という人には聖闘士星矢にこう言ってもらう「きみはコスモを感じたことがあるか!」
1〜3の工程はジップロックなどに入れ、めん棒などで叩いて作ることもできます。タルト台の溶かし無塩バターの量はビスケットの種類によって調整してください。タルト台は冷やしただけでも もちろん食べられます。サクサク食感がお好みの方はオーブンで焼いてください。
