今日教大家煮
📌酸菜魚
📌酸菜牛肉
📌芒果椰汁糕
🍏🍏母親節蘋果膠套裝購買連結🍏🍏
中文:https://bit.ly/3sswNiz
英文:https://bit.ly/3sqOajJ
20210417 live recipes
特別鳴謝easycook義工團寫的食譜
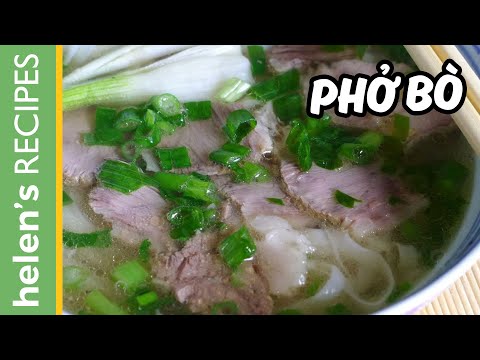
酸菜魚
材料: 桂花魚或其他魚,帶甜咸酸菜,大豆芽 ,泡椒 ,辣椒干,花椒 ,薑,蔥,紅辣椒,花椒
醃魚肉味料: 鹽少許,一隻蛋白,胡椒粉少許
做法: 1 燒熱鑊落油,猛火煎香魚骨,鹽少許,加滾水煮至湯濃白隔起魚骨
2 魚肉加鹽拌勻至感覺有些膠質後加一隻蛋白,胡椒粉少許拌勻待用
3 咸酸菜片薄切塊,白鑊炒至乾身
4 落油將薑絲,蔥頭,泡椒,大豆芽,咸酸菜炒香
5 開火煲熱魚湯落魚肉加鹽,菇粉各少許稍滾,魚肉鏟起放做法 4 面上,繼而淋上魚湯加一匙白醋
6 燒熱鑊落油爆香辣椒干及花椒後倒入酸菜魚湯內,紅椒粒,蔥花飾面
肥媽 Maria Cordero
YouTube Live – April 17, 2021 Recipe English Version
Hot and Sour Fish Soup with Pickled Mustard Greens
(YouTube video starts at 1:33.)
Ingredients:
Fish - 1 large sea bass (or your choice of fish)
(Separate the meat from the bones and head. Thinly slice the meat at 45-degree angle into bite size pieces. For larger pieces, make a slit in the center of each slice. Set aside.)
Chinese pickled mustard green (“syun choi” or “hum choi”) - 1 package
(Important to choose ones that are SWEET tasting instead of salty.)
(Slice horizontally into half then slice vertically into pieces. Pat dry then pan fry them without oil until dry and fragrant. Transfer to a bowl. Set aside.)
Chinese pickled green chili (“pao jiao”) - 1 jar
Ginger shreds
Garlic pieces
Bean sprouts
Salt - to taste
Mushroom seasoning powder - to taste
White vinegar - 1 tbsp
Potato starch noodles or glass noodles “fensi” - optional to add into the soup
Fish soup base ingredients:
Fish bones
Fish head
Ginger slices - for frying the fish bones and head
Ginger slices - for making the soup
A dash of salt
Very hot boiling water (to make the fish soup creamy white)
Marinade fish meat ingredients:
Salt - a dash
Egg white - 1
White pepper - a dash
Garnish ingredient:
Dried chili
Sichuan peppercorns
Green onion pieces
Fresh red chili pieces
Sichuan peppercorn oil
Methods:
1. In a bowl, add in all the fish meat, a dash of salt, and thoroughly mix until slightly sticky. Add in 1 egg white, a dash white pepper, and mix well. Set aside.
2. Heat up a wok to very hot and add oil. Sprinkle in a dash of salt, add in ginger slices, and add in fish bones and head to make the soup base. Fry them until fragrant and golden brown on HIGH heat, and remove the ginger slices.
3. Add in very hot boiling water, add ginger slices, and bring it to a boil and cook until creamy white. Turn off heat and remove all the fish bones and head and pour the soup through a strainer into a bowl.
4. Return the soup back to the wok and add in marinated fish meat prepared in Step 1 and simmer until cooked. Add in salt and mushroom seasoning powder to taste. Set aside.
5. Heat up a wok, add in oil. Add in ginger shreds, garlic pieces, Chinese pickled green chili, and stir fry until fragrant. Add in bean sprouts, Chinese pickled mustard greens, and mix well. Add in cooked fish meat and fish soup.
6. Drizzle in 1 tbsp of white vinegar.
7. Heat up a separate frying pan, and add oil. Add in dried chili, Sichuan peppercorns, and pour on top of the soup.
8. Garnish with fresh red chili and green onion pieces.
9. Drizzle Sichuan peppercorn oil on top.
🌟🌟🌟🌟🌟🌟🌟🌟🌟🌟🌟🌟🌟🌟
酸菜牛肉
材料: 牛肉,青紅辣椒,咸菜
香料: 薑一片,蒜一粒
醃料: 糖少許,胡椒粉少許,鼔油,生粉適量
做法: 1 牛肉先醃備用
2 落油爆香薑,蒜,青紅辣椒,落牛肉炒,最後加咸菜炒勻即可
備註: 咸菜有二隻,一帶甜,另一帶咸,今次是帶甜
咸菜處理可參考酸菜魚
煮酸菜牛肉可試味需否加糖
肥媽 Maria Cordero
YouTube Live – April 17, 2021 Recipe English Version
Stir Fried Beef with Pickled Mustard Greens
(YouTube video starts at 26:56.)
Ingredients:
Beef steak slices
(You can replace with beef tenderloin or pork.)
Chinese pickled mustard green (“syun choi” or “hum choi”) - 1 package
(Important to choose ones that are SWEET tasting instead of salty.)
(If you are using the SALTY type, just add more sugar.)
(Slice horizontally into half then slice vertically into pieces. Pat dry then pan fry them without oil until dry and fragrant. Transfer to a bowl. Set aside.)
Red and green sweet bell peppers - sliced
Minced ginger
Minced garlic - 1 clove
Marinade beef ingredients:
Cooking oil
Sugar
Light soya sauce
White pepper
Corn starch / flour
Methods:
1. In a bowl, add in sliced beef steak, cooking oil, sugar, light soya sauce, white pepper, corn starch, and mix well. Set aside.
2. Heat up a wok, add oil. Add in minced ginger, minced garlic, red and green sweet bell pepper slices, marinated beef slices, and briefly stir fry until fragrant. Transfer to a bowl. Set aside.
3. Heat up the wok, add Chinese pickled mustard greens. Optional to add sugar now if you find it salty.
4. Return the partially cooked beef back to the wok, and mix well. Transfer to serving plate. Serve.
🌟🌟🌟🌟🌟🌟🌟🌟🌟🌟🌟🌟🌟🌟🌟🌟🌟🌟🌟🌟
芒果棷汁糕
材料:
凍滾水 250 ml
奶 250 ml
魚膠粉 35 gr (可改用魚膠片5-6片)
沙糖 100 gr (可依個人喜好加減)
棷奶 1罐
芒果 2-3個
做法:
1. 凍滾水、奶 、魚膠粉、沙糖放入煲內,開中大火煮,邊煮邊輕輕攪拌至魚膠粉和糖完全溶解。
2. 加入棷奶,攪拌至混合後關火,放涼備用。注意:加入棷奶後不要煮太久,以避免油水分解。
3. 芒果去皮切粗條或粗粒,排放入糕盆內,倒入已放涼棷奶混合液,蓋好後放入雪櫃雪至硬身便可
肥媽 Maria Cordero
YouTube Live – April 17, 2021 Recipe English Version
Mango Coconut Pudding
(YouTube video starts at 35:35.)
Ingredients:
Drinking water - 250ml (do not use tap water)
Milk - 250ml
Gelatin powder - 35g (or replace with agar agar)
Sugar - 100g or to taste
Coconut milk - 1 can
(Add in last to avoid the oil separating, which will result in two layers when pudding is set.)
Fresh mangos - cut into your choice of designs. (Cubes or strips or floral.)
(Cut into THICK pieces to avoid pieces from moving.)
Methods:
1. In a cooking pot, add in drinking water, milk, gelatin powder, sugar, and cook until sugar and gelatine have melted and little bubbles appear by continue stirring.
2. Add in coconut milk and taste test for sweetness.
3. Let it cool down to room temperature.
4. In a mould, add in fresh mango pieces on the bottom layer then pour coconut milk mixture on top.
5. Put in the refrigerator to set.
6. Cut into cubes. Serve.
To create mango layers:
Optional to layer mango pieces on the bottom of the mould then refrigerate until they are a bit dehydrated and stick to the mould. This is to prevent them from moving or floating.
Once the mango pieces are set on the bottom of the mould, pour half of the coconut milk mixture in and set in the refrigerator for about 30 minutes.
After 30 minutes, or once the pudding is set, add the remaining mango pieces, coconut milk mixture, and refrigerate it until set and firm. You may create more than 2 layers.
Once set, loosen the pudding from the mould and transfer to a serving plate with the bottom of the pudding facing upward displaying the mango pieces design. Slice and serve.


bones water 在 Professor Ptthmllnsprts Versus Old Bones - History Today 的八卦
The Water-Babies was a fairytale that straddled religion and science, railing against logical rationality in the face of nature's mysteries. ... <看更多>